Call forwarding and User status
Introduction
The Call forwarding rules and setting your status are closely related: Presence/Status allows you to see the presence of your colleagues and instantly know whether a colleague is available, busy or away before making the transfer.
Furthermore, your own presence/status is linked to the call forwarding rules. The call forwarding feature allows you to automatically forward an incoming call to voicemail, another extension, an external number, your mobile, or send a busy signal, depending on your current status and time.
Tip: You can configure your client to automatically switch between “Available” and other statuses based on your office hours. Ask your administrator for this feature.
Tip 2: You can also have a status applied for a particular time, say one hour, and then have it change back to what default status. For example, if you plan to go out for lunch for an hour and don’t want to be disturbed, just select “Set status temporarily”, select Away and specify 60 minutes.
Setting your Status

To set your status:
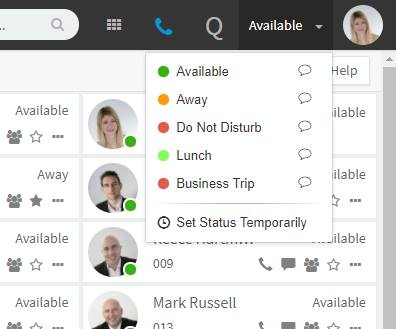
- In the web client, select it from the drop down in the right hand corner.
- In the Windows, Mac, iOS you can click or tap on your current status.
- You will be able to choose from five preset statuses. You can also set an optional status message.
- You can choose to set your Status temporarily for a particular period of time using the “Set Status Temporarily”option.
It is also possible to use a custom VoiceMail Greeting for specific statuses.
Configuring Call Forwarding Rules

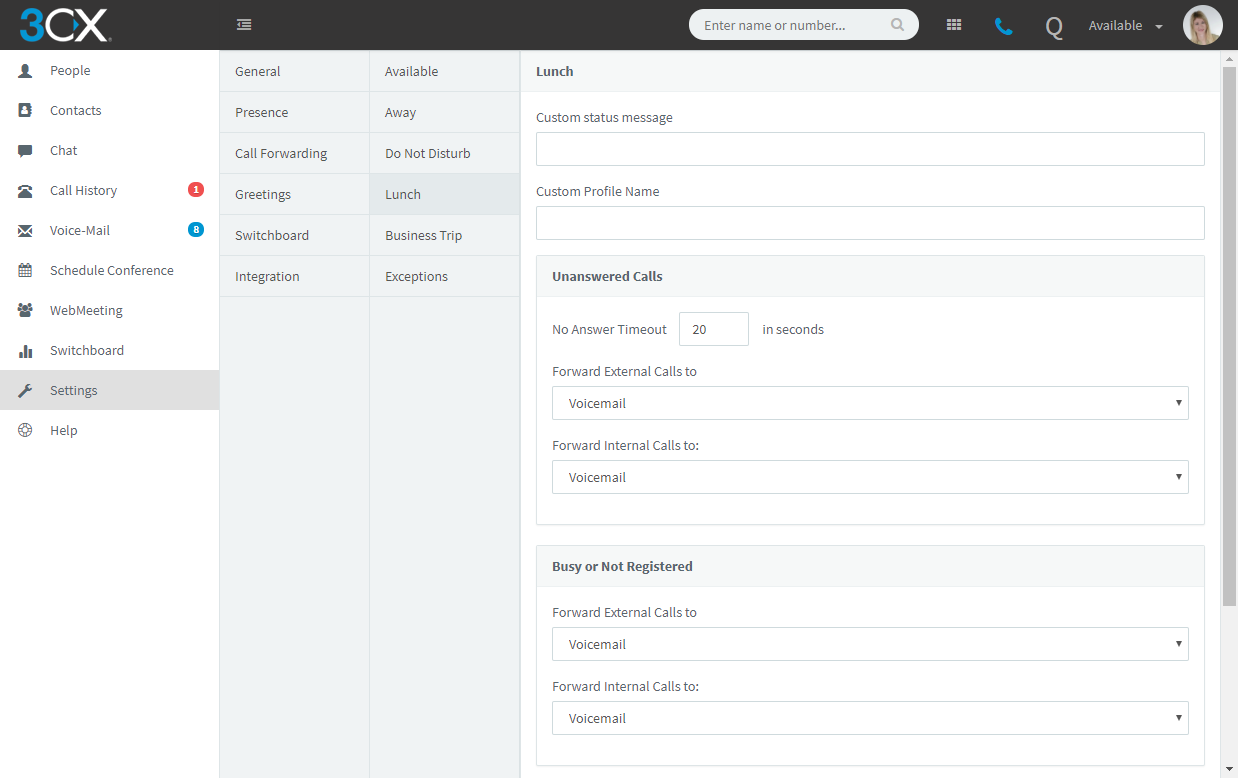
- In the Web Client go to “Settings > Call Forwarding”.
- From the list select the status to access the forwarding rules.
- Enter a custom status message, for example “Out to lunch”. Your status will appear as “Available - Out to lunch”.
- Now specify what to do with calls that you can not answer:
- No Answer Timeout: Set the time in seconds after which the call will be considered unanswered.
- Specify where to forward the call to
- My Voicemail: Forwards to your voicemail.
- Extension: Forwards to another extension.
- An Extension’s voice mail - Forwards the call to the extension’s voicemail.
- My Mobile1: Forwards to your mobile number. Your mobile number must be configured in 3CX Phone System by your administrator.
- External Number 1 ,2: Specify an external number to forward your calls to.
- System Extension: Forward to a special extension set by the administrator i.e Conference
- Send Busy: Sends a busy tone and disconnects the call.
- You can specify different behaviour for internal calls using the “Forward Internal Calls To:” option.
- Now specify where to forward calls to if you are on the phone or if your phone is unregistered (i.e. not active). The same options apply as for unanswered calls.
- If you are setting your status to Away or Business Trip, you can specify a time that you will be away, so that 3CX can automatically switch back your status to Available at the end of the time period.
- Also Ring My Mobile - Enabling this will simultaneously ring your mobile number.
- Accept Multiple Calls - Allows you to receive multiple calls, even if you are already on the phone.
- You can rename the “Business Trip” status by specifying the alternate name in the “custom profile name”field
1 When the “Rebound” option is enabled, the called party will be notified of an incoming call and will be given the option to take the call or to direct it to voicemail.
2 When sending calls to an “External Number” the option “Use Call Deflection (302)” can be enabled.
In order to use this option the following states must be covered: The call must be in ringing state while deflecting it to the external destination. Call from ring group can not be diverted as it would break the hunt of the ring group it self. Also the provider been used must support 302 as a service otherwise the call will fail.
Exceptions to Forwarding Rules
You can have calls from particular numbers treated differently (max. 15 exceptions per extension).
- Go to “Settings” and select “Call Forwarding.”
- Click on “Exceptions.”
- Select the Add button to add a new rule;
- In the “Calls from Caller ID” field, enter the number you want this rule to apply to
- In “Received During,” specify any time period you want to limit the rule to:
- All hours.
- Office hours.
- Out of office hours.
- Specific hours: Hours that you have specified.
- Specific hours excluding holidays: Hours that you have specified, excluding holidays.
- Outside specific hours: The rule applies when out of specified hours.
- Outside specific hours including holidays: The rule applies when out of specified hours, including holidays.
- In “Forward To.” specify what to do with the call.
- Click “OK” to return to the Exceptions Rule list - you will see your newly created exception.
- Click save.
Note: Even though you have set an Exception Rule, the call will appear as a missed call on your notifications screen.
Setting your Presence Status Automatically
You can have your status automatically set to “Do Not Disturb” or “Available” based on your office hours. This has to be done by the administrator through the 3CX Management Console. Ask your administrator about this feature. During office hours you will be logged in as “Available” and when your office hours end, your 3CX client will automatically switch its status to “Do Not Disturb”.